BREIFING
MISSION DETAILS
DAY OR NIGHT MISSION
TARGET LIST
MISSION TABLES
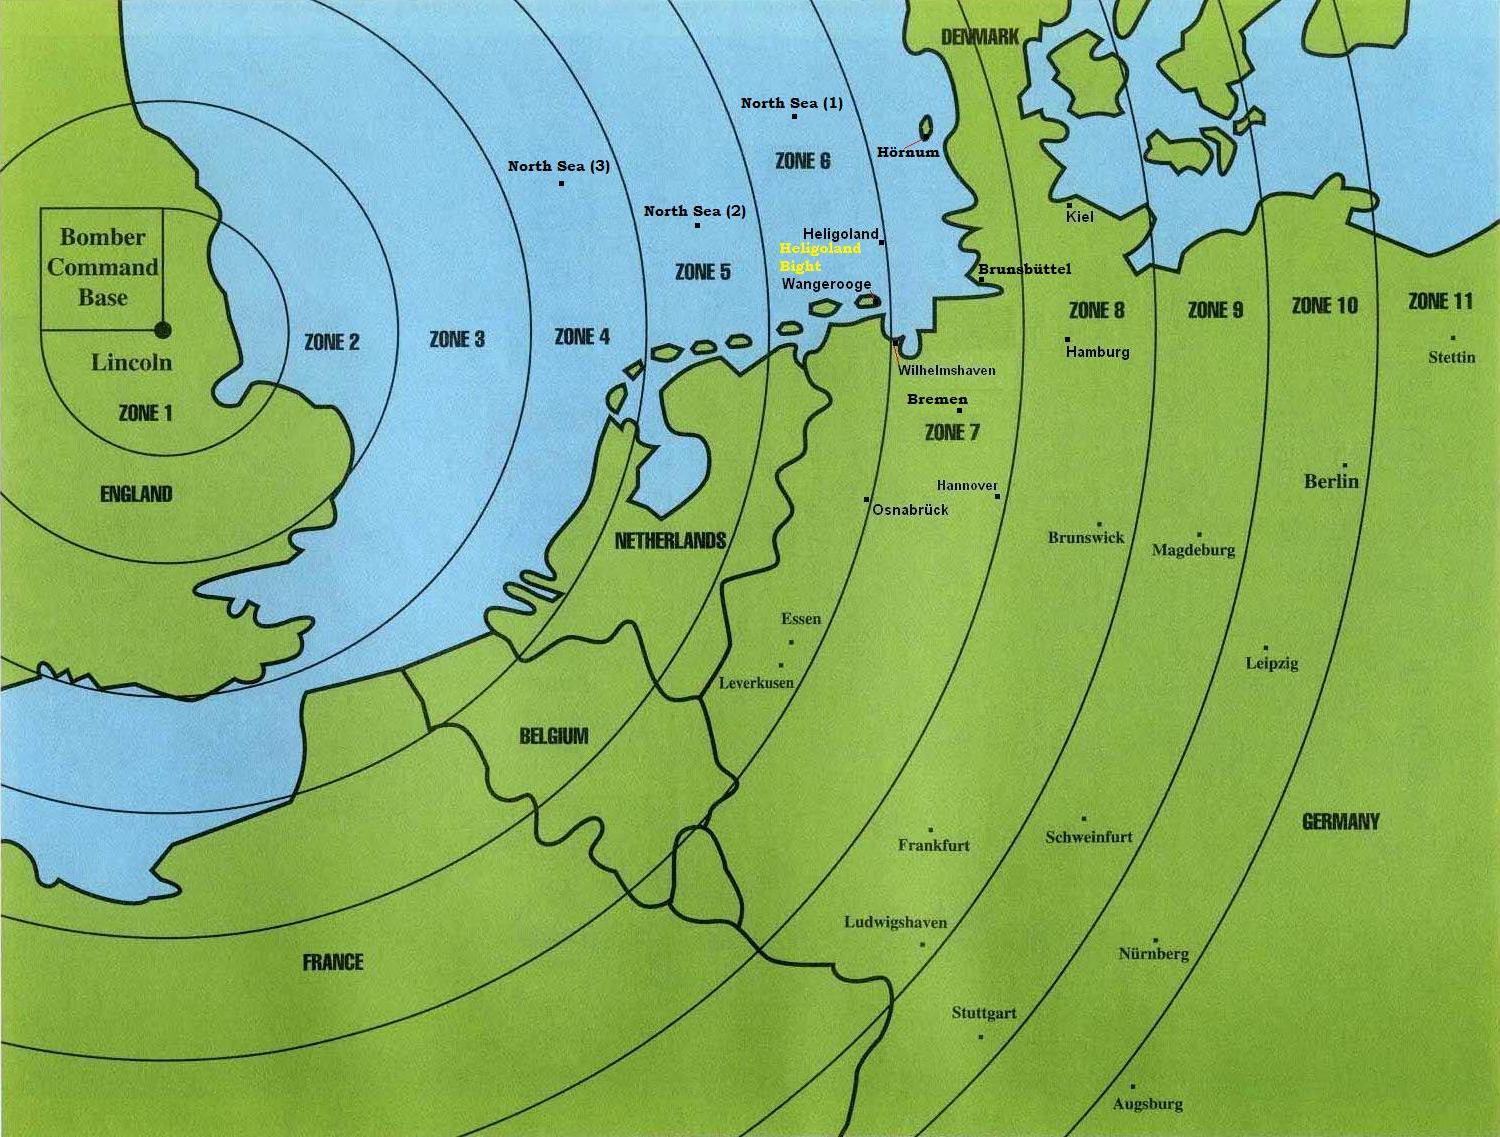
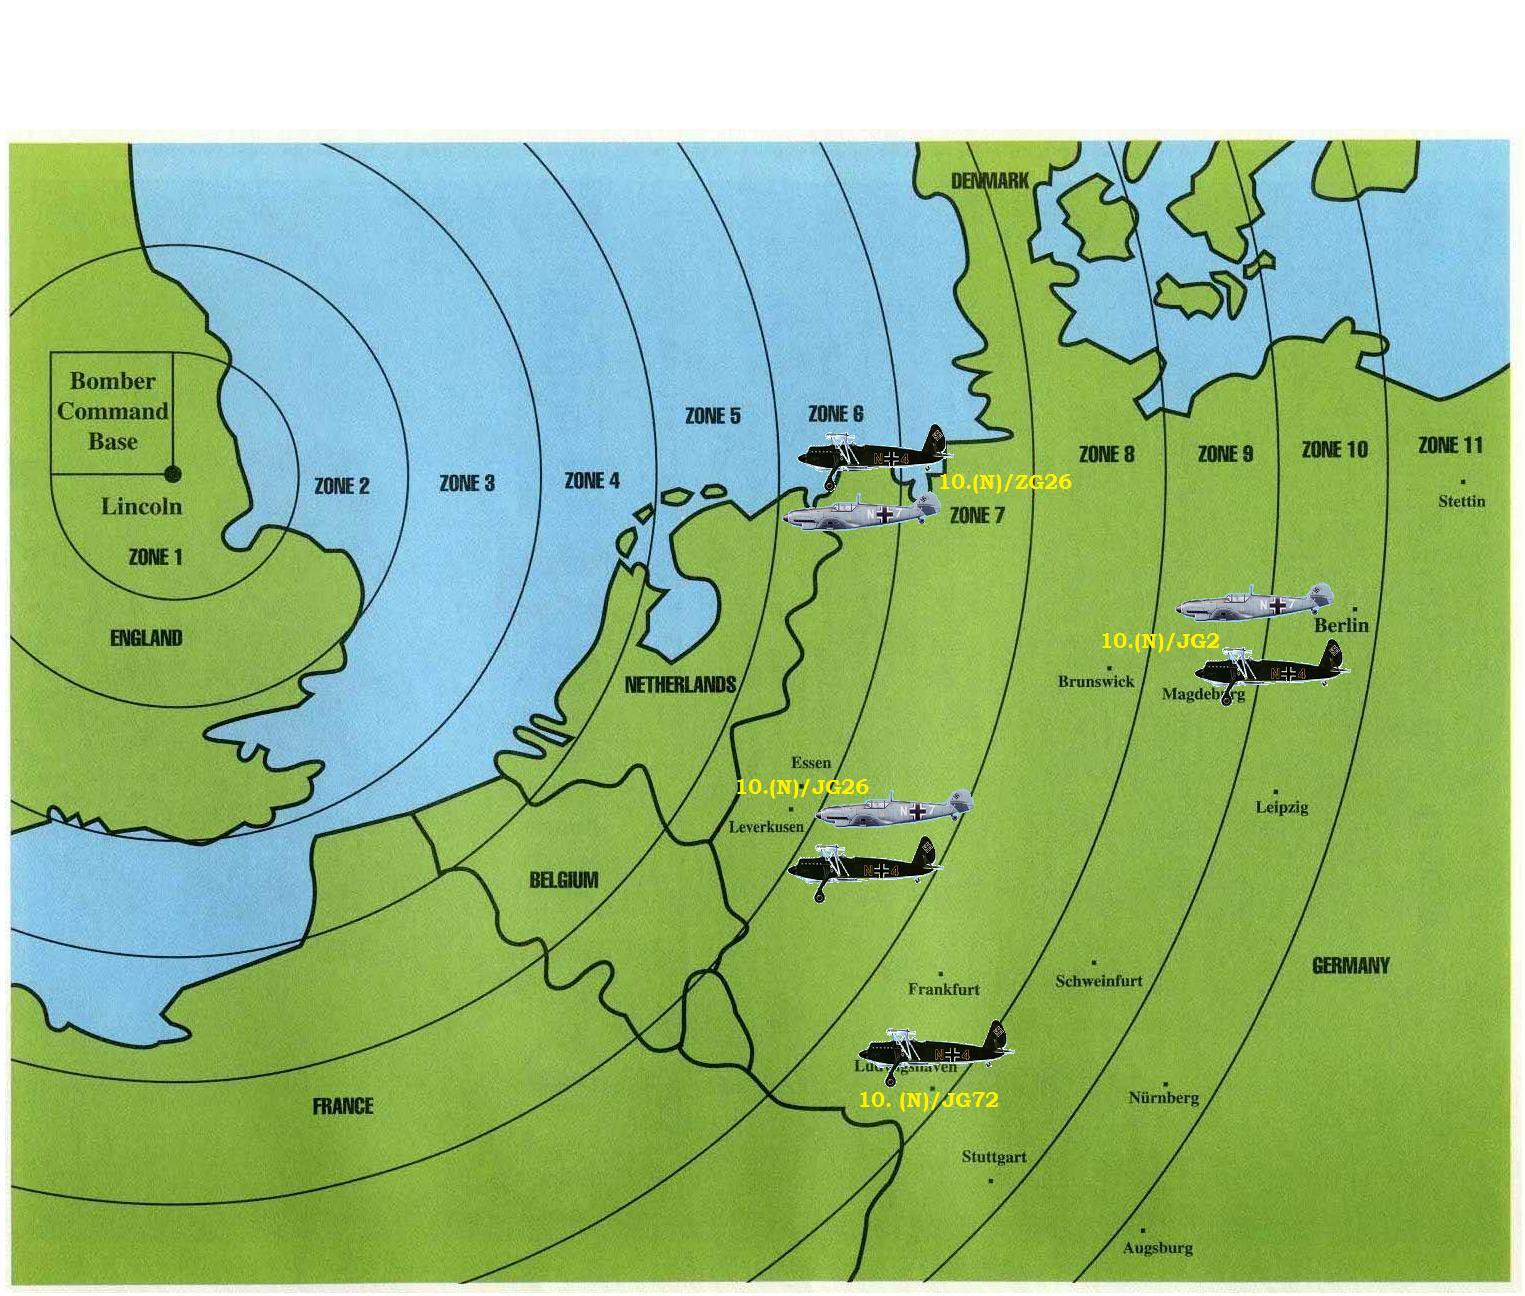
Mission Map
September 1939 to March 1940

 LUFTWAFFE DAY FIGHTER
DEFENSES SEPTEMBER 1939
LUFTWAFFE
NIGHT FIGHTER DEFENSES SEPTEMBER 1939
LUFTWAFFE DAY FIGHTER
DEFENSES SEPTEMBER 1939
LUFTWAFFE
NIGHT FIGHTER DEFENSES SEPTEMBER 1939
LUFTWAFFE DAY/NIGHT FIGHTERS
Table B-3
September 1939 to December 1939
Hampden Files (zip)
******************************************
314 SQUADRON HEADQUARTERS
LANCASTER
******************************************
******************************************
4 Staffel, II Group Kampfgeschwader 53 Crew
Heinkel He 111
Heinkel He 111 The Spade Sneak Peek
The German Twin-Engine Bomber in the Battle of Britain
MISSION DETAILS
DAY OR NIGHT MISSION
| SEPTEMBER 1939 TO MARCH 1940 | |||
| 2D6 |
TIME
OF MISSION
|
||
| 2 |
Day mission - Very good weather - Bomb Run +1. | ||
| 3 | Night mission.(See also Search Light Table below.) | ||
| 4 | Night mission.(See also Search Light Table below.) | ||
| 5 | Night mission.(See also Search Light Table below.) | ||
| 6 | Day mission. | ||
| 7 | Night mission.(See also Search Light Table below.) | ||
| 8 | Day mission. | ||
| 9 | Night mission.(See also Search Light Table below.) | ||
| 10 | Day mission. | ||
| 11 | Day mission. | ||
| 12 | Night mission - Very good weather - Bomb Run +1. | ||
| HISTORICAL
NOTES * On April 12, 1940, 6 Hampdens and 3 Wellingtons were lost on a misson to Stavanger, Norway. It was the last day mission for these bombers. |
|||
TARGET LIST
| SEPTEMBER 1939 TO MARCH 1940 | |||
| 2D6 |
TARGET
AREA AND TARGET |
||
| 2 |
Brunsbüttel, Navy Ships (Flak: +1) | ||
| 3 | Bremen, Leaflets (Nickelling) | ||
| 4 | The Ruhr, Leaflets (Nickelling) | ||
| 5 | North Sea (1) Anti-Shipping Patrol | ||
| 6 | North Sea (2), Anti-Shipping Patrol | ||
| 7 | North Sea (3), Anti-Shipping Patrol | ||
| 8 | Heligoland Bight, Navy Ships | ||
| 9 | Wilhelmshaven, Port | ||
| 10 | Hamburg, Leaflets (Nickelling) | ||
| 11 | Hamburg, Leaflets (Nickelling) | ||
| 12 | Hörnum (on Sylt), Seaplane Base | ||
| HISTORICAL
NOTES * Blenheim, Wellington, Whitley and Hampden were used on these missions. * The first daylight mission of the war was on September 29, 1939 to Heligoland Bight. * Due to bad weather in February 1940 there were no night missions and day missions were cancelled during the first two weeks. * The Seaplane base at Hörnum (on Sylt) was bombed 19/20 March 1940 after an attack on Scapa Flow two nights earlier. |
|||
| GAZETTEER SEPTEMBER 1939 TO MARCH 1940 |
||||||||||
| TARGET AREA AND TARGET | ZONE 1 | ZONE 2 | ZONE 3 | ZONE 4 | ZONE 5 | ZONE 6 | ZONE 7 | ZONE 8 | ZONE 9 | ZONE 10 |
| Bremen | E/W | W | W | W | -1/W |
+1/G |
+1/G |
|||
| Brunsbüttel | E/W | W | W | W | -1/W |
+0/W |
+2/W/G |
Your bomb run will be on the Anti-Shipping Patrol Bomb Run Table below. | ||
| Hamburg | E/W | W | W | W | -1/W |
+0/W/G |
+2/W/G |
+2/G +1 |
||
| Heligoland Bight | E/W | W | W | W | -1/W |
+0/W |
Your bomb run will be on the Anti-Shipping Patrol Bomb Run Table below. | |||
| Hörnum | E/W | W | W | W | -3/W | -2/W -1 |
+0/W/G -1 |
|||
| North Sea (1) | E/W | W | W | W | W | -1/W -2 |
Your bomb run will be on the Anti-Shipping Patrol Bomb Run Table below. | |||
| North Sea (2) | E/W | W | W | W | +0/W -1 |
Your bomb run will be on the Anti-Shipping Patrol Bomb Run Table below. | ||||
| North Sea (3) | E/W | W | W | -3/W | Your bomb run will be on the Anti-Shipping Patrol Bomb Run Table below. | |||||
| The Ruhr | E | E | W | W/N | N |
+2/G +1 |
||||
| Wilhelmshaven | E/W | W | W | W | -2/W |
-1/W/G |
+0/W/G |
|||
| NOTES North Sea (1), (2) and (3): When you are in the Target Zone, roll first on Table B-2 below and then on the Anti-Shipping Patrol Table to spot ships.
On NIGHT MISSIONS: Night fighters may appear in the zone.
Roll below on Table B-1 or B-2 Night! Use only terrain and only the modifier beneath the
insignia if stated. (If no modifier beneath the insignia DR is +0.)HISTORICAL NOTES * Routes over Belgium and the Netherlands were usually avoided. (The route over the Netherlands to the Ruhr would probably be over Germany along the border from the North.) |
||||||||||
MISSION TABLES
| TABLE B-1 AND B-2 | ||||
| 2D6 |
DAY | NIGHT | ||
| B-1 | B-2 | B-1 | B-2 |
|
| 2 |
None | None | None | None |
| 3 | None | None | None | None |
| 4 | None | None | None | None |
| 5 | None | None | None | None |
| 6 | None | 1 | None | None |
| 7 | 1 | 1 | None | None |
| 8 | 1 | 1 | None | None |
| 9 | 1 | 1 | None | 1 |
| 10 | 1 | 2 | None | 1 |
| 11 | 2 | 2 | 1 | 1 |
| 12 | 2 | 3 | 1 | 2 |
|
NOTES If fighters appear, go to Table B-3. HISTORICAL NOTES * The night fighters were usually operating at dusk or dawn using the evening or morning sunlight to spot bombers. They were not effective. |
||||
| ANTI-SHIPPING
PATROL ROLL ON THIS TABLE AFTER B-2 ABOVE |
|||
| 2D6 |
TIME OF MISSION | Notes | |
| DAY | NIGHT | ||
| 2 |
None | None | |
| 3 | None | None | |
| 4 | None | None | |
| 5 | None | None | |
| 6 | None | None | |
| 7 | None | None | |
| 8 | None | None | |
| 9 | Ships! | None | Ships spotted! Bomb run!* |
| 10 | Ships! | None | Ships spotted! Bomb run!* |
| 11 | Ships! | None | Ships spotted! Bomb run!* |
| 12 | Ships! | Ships! | Ships spotted! Bomb run!* |
| *
ANTI SHIPPING PATROL BOMB RUN D6: Brunsbüttel: DAY: +2 first roll. NIGHT: +1 first roll Heligoland Bight: DAY: +1 first roll. NIGHT: No modifier. 1-5: Miss! 6: Ship HIT! (Roll D6 again: 1-3: Light damage. 4-5: Serious damage. 6: Ship sunk! You re responsible for the critical hit that sunk the ship!) HISTORICAL NOTES * These missions were usually ineffective, especially at night. |
|||
| SEARCH LIGHT | |||
| 1D6 |
Notes |
||
| 1 |
Search lights around your bomber but they miss you! | ||
| 2 | Search lights around your bomber but they miss you! | ||
| 3 | Search lights around your bomber but they miss you! | ||
| 4 | Search lights around your bomber but they miss you! | ||
| 5 | Your bomber is caught in a search light! | ||
| 6 | Your bomber is caught in a search light! | ||
| NOTES * If you are not caught in a search light, roll for flak To Hit x2. * If you are caught in a search light, roll for flak To Hit x3 and +1 on Fighter Table B-2 (Night). HISTORICAL NOTES The Luftwaffe ground and air defenses were not co-ordinated yet. |
|||
| TARGET ZONE ORDER OF ACTIONS | |||
| STEP |
Notes |
||
| 1 |
Check the weather (if you haven't already at breifing). | ||
| 2 | Night fighter might find you! Roll 2D6 on Table B-2 (Night). | ||
| 3 | You have reached the Target! Check for search light, if Good weather only! | ||
| 4 | You have a choice of rolling for Flak To Hit or 2D6 on Table B-2 (Night). | ||
| 5 | If
step 4 was fighter, roll for flak to hit. If step 4 was Flak To Hit, roll for fighter. |
||
| 6 | Bomb run! | ||
| 7 | Turn around over the Target. | ||
| 8 | If good weather, check for search light again. (Your bomber was lost if caught before when you turned around, and a new position is trying to find you.) | ||
| 9 | You have a choice of rolling for Flak To Hit or 2D6 on Table B-2 (Night). | ||
| 10 | If
step 4 was fighter, roll for flak to hit. If step 4 was Flak To Hit, roll for fighter. |
||
| 11 | Move into the next zone. | ||
| NOTES HISTORICAL NOTES |
|||
Mission Map
September 1939 to March 1940
LUFTWAFFE DAY/NIGHT FIGHTERS
Table B-3
September 1939 to December 1939
Hampden Files (zip)
******************************************
314 SQUADRON HEADQUARTERS
LANCASTER
******************************************
******************************************
4 Staffel, II Group Kampfgeschwader 53 Crew
Heinkel He 111
Heinkel He 111 The Spade Sneak Peek
The German Twin-Engine Bomber in the Battle of Britain